
Laser, Lava and Worm: Five Horde Tricks for the Bosses That Break Good Teams
Updated Oct 25, 2026
Most Horde losses at higher difficulty are not about raw stats. They come from three bosses that ignore the usual "stand and trade" plan: the Laser Zobo, which burns a whole row of your units in one beam; the Lava Zobo (Volcano), which comes back after dying and erupts right on your front line; and the Worm, which teleports to the far end of the board where most of your Tatari cannot touch it. None of them needs a stronger account. They need the right trick at the right moment, and the same five tricks cover all three.
A quick note on timing: in the Companion's season 3 roster the laser boss is wave 5 and Volcano is wave 19, and the Worm appears to be the Sandworm Zobo at wave 11. The lobby used for the original walkthrough had the laser boss at wave 24, so read the boss icons in your own lobby before you plan.
How to picture the board
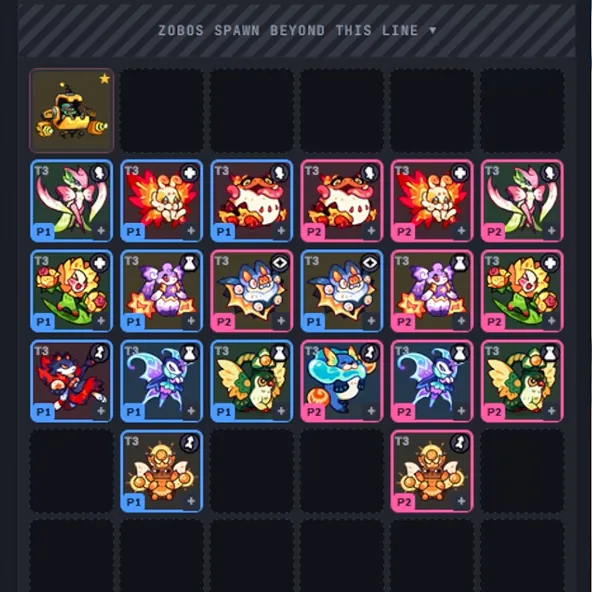
Think of the field as six lanes; lane 1 is the far left and lane 6 the far right. Zobos spawn above the top line and walk down towards your base at the bottom. You hold one half and your partner holds the other. The examples below use this team, mirrored across both halves; copy the ideas, not the exact units:
| Position | Units |
|---|---|
| Front | Serrabloom on each outer edge, Charflutter  , Lickflicker  |
| Second line | Solaflora , Cheerspring  , Sonarbat  |
| Third line | Silversear , Waveflutter  , Chronerva  , Seaswirl  |
| Rear | Zenscarab |
Against the Volcano, Blitzmane takes Charflutter's spot. Against the Worm, Thornwisp
 and Armorjaw
 join.

 .
Trick 1: open the gate
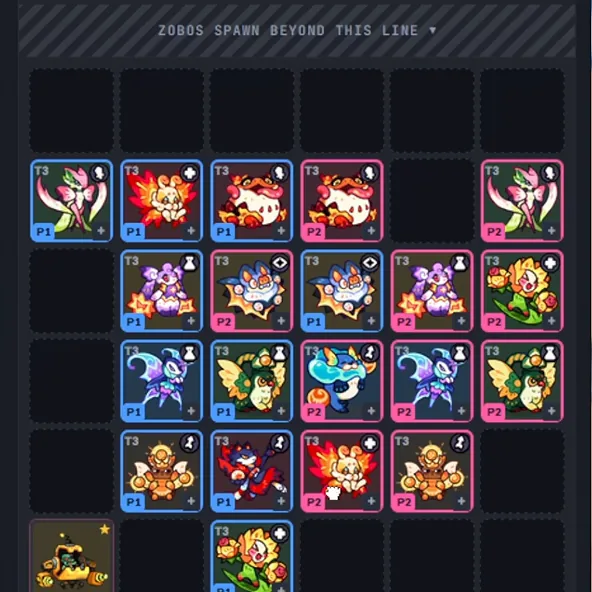
It feels wrong, but sometimes the cheapest answer is to let a boss walk straight past you. Pull your units out of its lane so the path is clear, let it march down to your base, and accept the small HP loss when it arrives.
- Laser Zobo. Clear the lane *before* the beam fires. The boss keeps walking instead of stopping to laser your row.
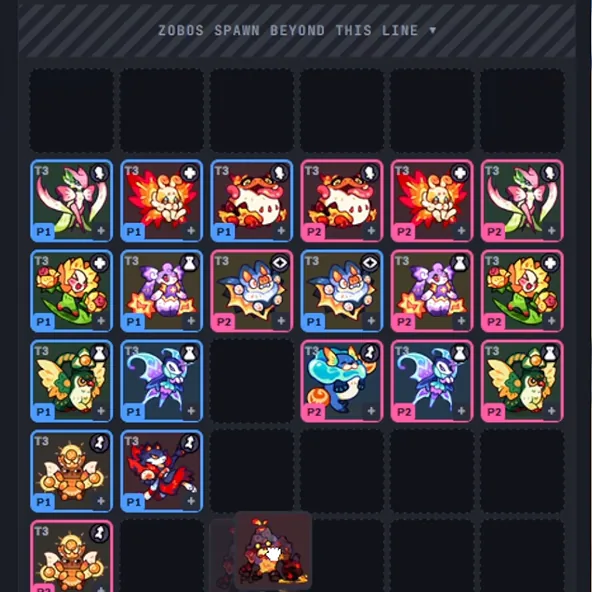
- Lava Zobo. It revives, so killing it takes forever, and each eruption hurts. Reaching your base costs you only a little HP. Letting it through is usually the better trade.
The one rule: everything that slips through, boss plus escorts, must cost less HP than you have left. Go over and the run ends. If the lane is crowded, hold for a while and thin out the small Zobos first, then open the gate once only the boss and a handful of escorts remain.
Close it again quickly. The moment the boss is past your front row, slide your edge guardian (Serrabloom in the example) back into the lane, then refill the gaps behind it. Leave the lane open and new spawns will pour through. Once the boss is gone you can also send spare units to help with a boss in another lane, for example moving Charflutter and Serrabloom across for extra damage.
Trick 2: let the mowers do it
With the Lawn Care chip, the mower at the bottom of each lane becomes a tool rather than a last line of defence.
- Laser Zobo. Open the lane; the boss and its escorts walk into the mower, which wipes the small ones. Whatever survives reaches your base for a small HP cost.
- Worm. It will not walk to you, but small Zobos will. Empty its lane, let a few small Zobos trigger the mower, and the mower charges all the way up and slams into the Worm. Refill the lane afterwards and keep hitting it.
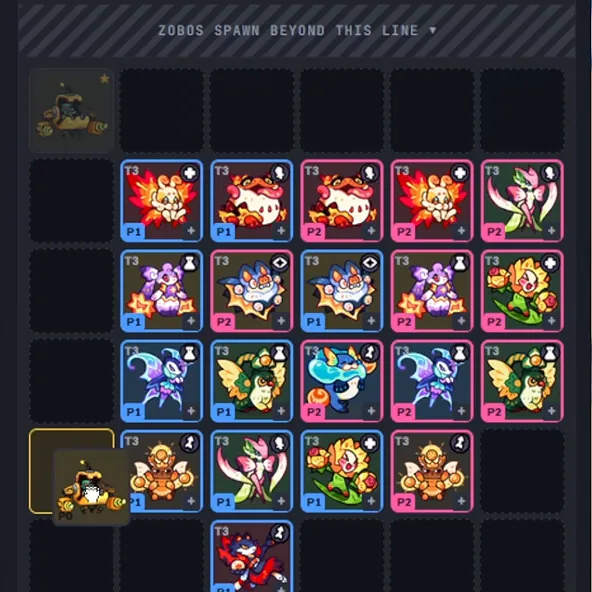
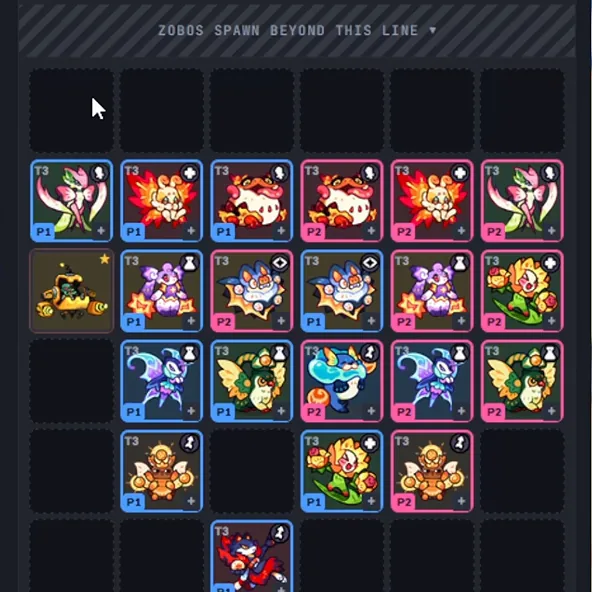 returns to block lane 1. The empty tiles behind are filled back in.
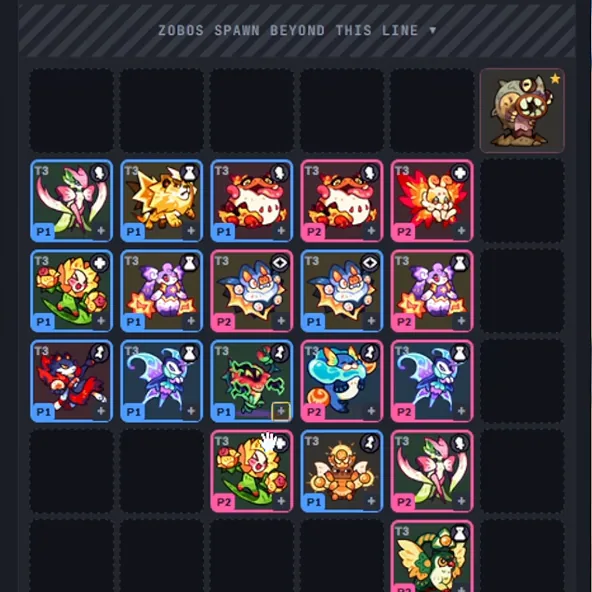
Trick 3: chain your crowd control
If your team is sturdy and well levelled, you can face a boss head-on by never letting it act.
Laser lock (Chronerva Lv 5 plus Zenscarab Lv 7). Swap both into whichever lane the laser boss enters. Your partner does not need a Zenscarab, as long as yours meet those levels. The rhythm:
| Beat | What happens |
|---|---|
| The boss stops to aim | Chronerva's skill teleports it backwards and the beam is cancelled. |
| It walks back down | Crowd control and Zenscarab's vortex hold it in place. |
| Chronerva's skill is ready | Teleport it again and repeat until it falls. |
The waves around the laser boss tend to be quieter, so you often have time to deal with other bosses in between.
Volcano push-back. The farther from your units it erupts, the less it hurts, so keep it at a distance. Blitzmane's knockback shoves it up the lane again and again, which is a big reason that unit is so popular in Horde; a Lv 7 Seaswirl adds a small push too. Tideon 's slow stretches the walk of an already slow boss even further.
Worm pull (Armorjaw). Drop Armorjaw into the exact lane the Worm appears in. Its pull drags the Worm down within reach of Serrabloom and your other front-liners. If you have Thornwisp levelled, the skills it unlocks at the fifth and seventh levels reach the Worm from long range with no pull needed, so it repays investment against this boss more than almost anything.
- ChronervaLv 5: its skill teleports Zobos backwards
- ZenscarabLv 7: its vortex pulls Zobos in and holds them
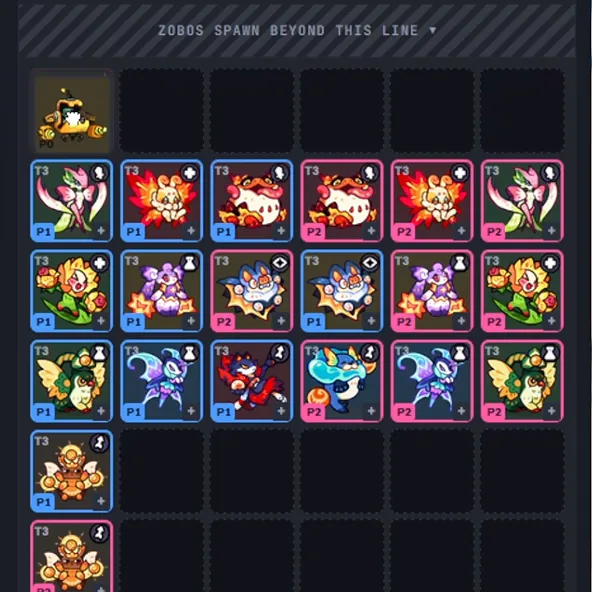 swaps into lane 1 with two Zenscarab right behind to lock Laser Zobo down together.
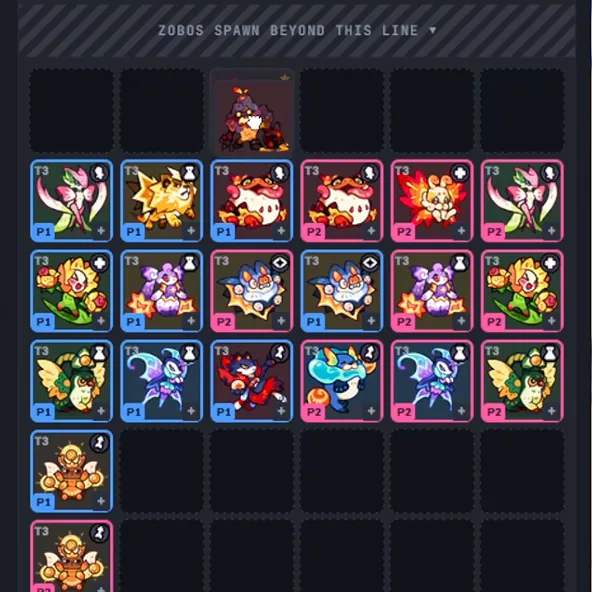 (the lion) takes Charflutter's front-row spot to keep knocking Lava Zobo back.
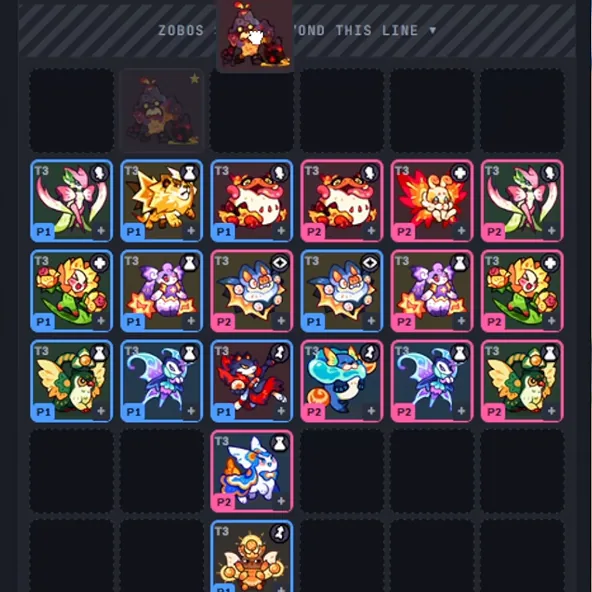 and Zenscarab slow Lava Zobo down. Remember to put Zenscarab in the lane next to the boss, not right in front of it.
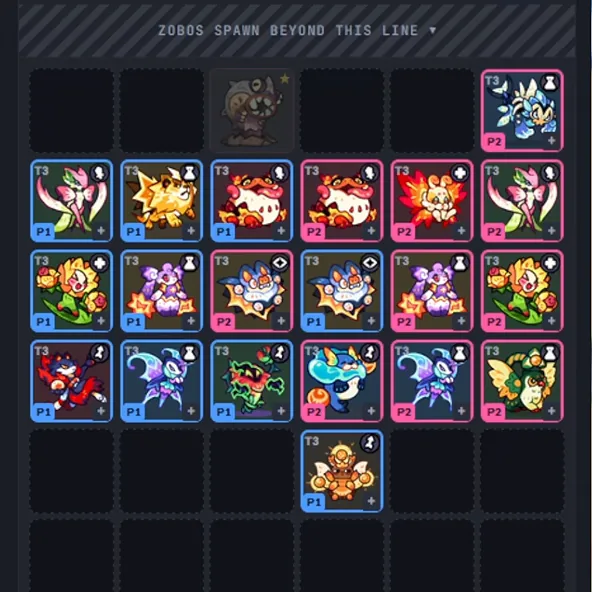 (the P2 card in the top row) is placed where Worm spawns to pull it into Serrabloom's range.
Trick 4: place the black hole carefully
Zenscarab's Lv 7 vortex pulls Zobos towards it. That is a gift or a disaster depending on where you stand it.
| Boss | Where Zenscarab goes | Why |
|---|---|---|
| Lava Zobo | An adjacent lane, never directly in front | The vortex spreads sideways and drags the boss back as it passes, so it arrives later. Directly ahead, the vortex can form in front of your units and pull the boss *into* your line to erupt. |
| Worm | The bottom corner tile of the Worm's lane, one tile away from it | The vortex forms based on attack range: the closer Zenscarab stands to a target, the farther out the hole appears. From the corner, it lands on the Worm and pulls it into Serrabloom's reach. |
Against the Volcano, the side lane needs enemies in it so Zenscarab actually triggers. Aim for one or two eruptions before it reaches your units; after that, finishing it is easy. One Lv 7 Zenscarab helps against all three bosses, which is why it shows up on so many Horde teams.
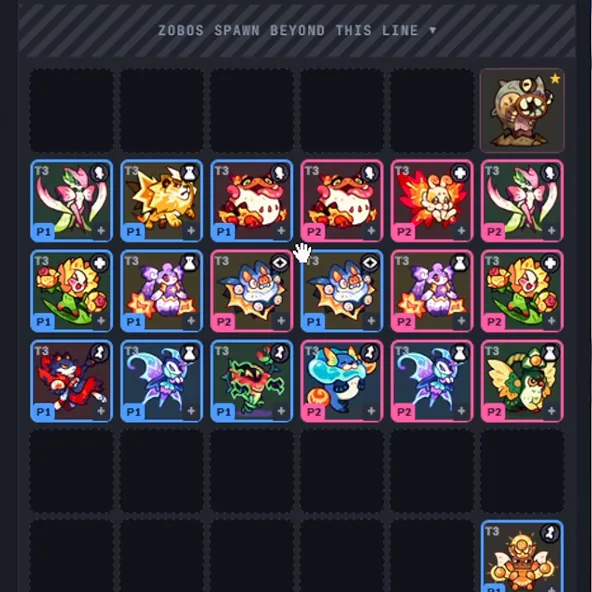 sits in the bottom corner of lane 6, in Worm's lane, so its vortex pulls Worm into Serrabloom's range.
Trick 5: when you have to tank the Volcano
Sometimes there is no clean gate to open. Serrabloom is Grass, and the Volcano is Fire, so it should only stand directly against that boss if you hold the Underdog chip, which turns a bad element matchup into a favourable one. Without it, do not use Serrabloom as the blocker:
- Rotate other units through the lane so the boss is always taking damage.
- Keep Weak on the boss at all times, for example with Seaswirl's bouncing shots. Weak cuts the damage of each eruption and is often the difference between losing one unit and losing the whole lane.
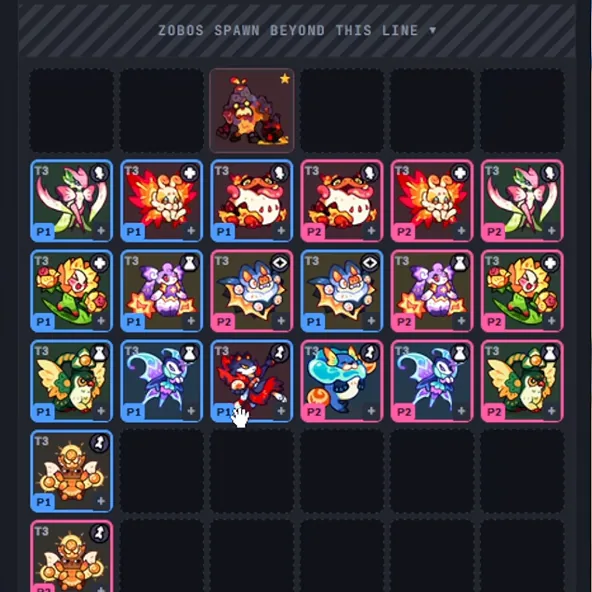 tank it head-on when you have the Underdog chip.
The last wave: reshape around the bosses
If you still have a healthy HP buffer and both edge lanes are calm, rebuild your layout around the boss lanes for the final push:
- Move most of your damage towards the Worm's lane. It is usually the toughest and the last to fall, and Grass damage dealers like Thornwisp suit it well.
- Open a nearby path to bring Charflutter in for its attack buff on the units doing the work.
- Chronerva hits hard enough to justify a spot right beside the boss lane instead of the middle. That frees the centre for Solaflora's Grass boost or a second damage dealer. Seaswirl's shots bounce sideways, so it can sit in a corner.
- In quiet lanes, let small Zobos through on purpose to save time, keeping the same HP rule from Trick 1.
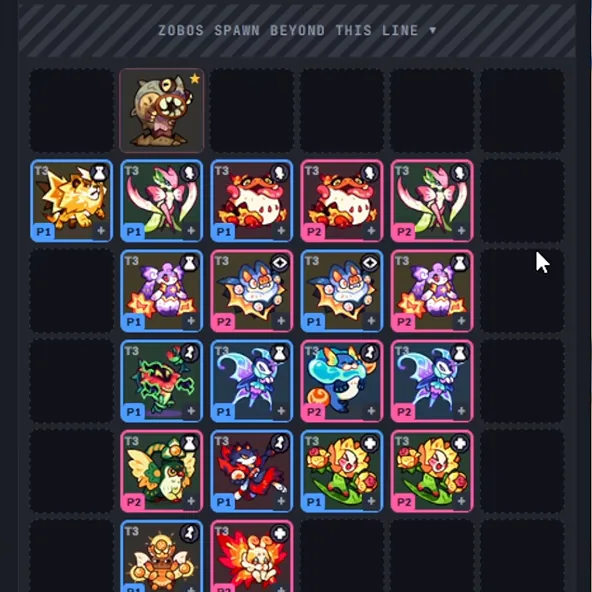
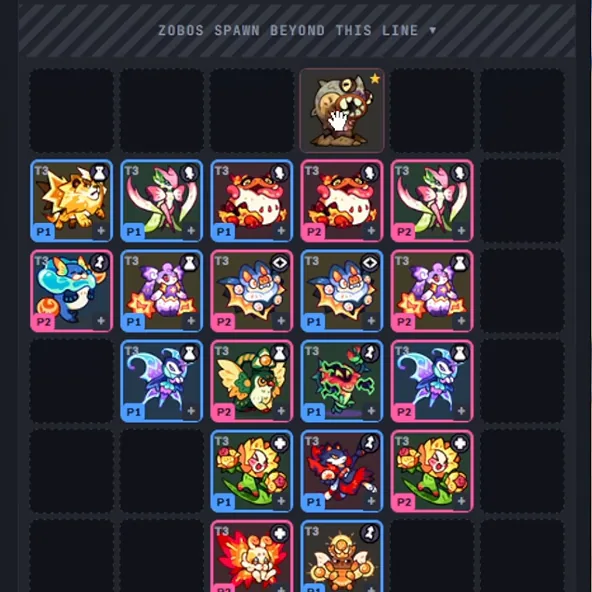 sits beside Worm's lane, Seaswirl on the left edge, and the whole team focuses damage on the boss area.
Cheat sheet
| Boss | First choice | Backup | Avoid |
|---|---|---|---|
| Laser Zobo | Open the gate before it fires | Mower, or the Chronerva + Zenscarab lock | Leaving a full row in its path |
| Lava Zobo | Open the gate | Blitzmane knockback, Tideon slow, Zenscarab in the side lane | Tanking with Serrabloom without Underdog |
| Worm | Thornwisp at Lv 5 or Lv 7 | Armorjaw pull, mower charge, corner Zenscarab | Waiting for it to walk into range |
The skill is less about which Tatari you own and more about when you step aside. For level costs and the full wave schedule see the Horde Season 3 numbers page, and for which units to build first check the Season 3 tier list.
Tatadex verdict
The technique Fox finds most surprising is "opening the path so the boss dies on its own": pulling Tatari back so Laser Zobo or Lava Zobo walks down to your base. It sounds backwards, but as long as fewer enemies get through than you have HP left, it is the cheapest way past that wave.
The team in the guide is only an example to show positions, so Fox suggests learning the placement and when to pull back, then applying that to your own team. Once you get the idea, you don't need the exact Tatari from the pictures.
Horde Season 3 mechanics →